The Best Fluffy Pancakes recipe you will fall in love with. Full of tips and tricks to help you make the best pancakes.



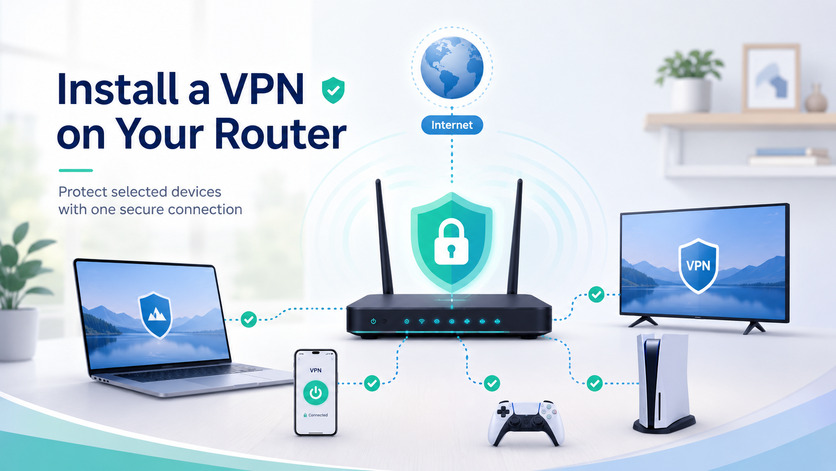
To install a VPN on a router, you usually need to configure the router as a VPN client, import a configuration file from your VPN provider, assign devices to the connection, and verify that internet traffic is passing through the VPN server.
The exact menu names depend on the router model and firmware. On a compatible router, the process may take less than 15 minutes. On an ISP-supplied router without VPN client support, no configuration file will fix the limitation. You will need a second VPN-compatible router, different firmware, or VPN apps on individual devices.
Before opening the router settings, understand one important distinction: a VPN client and a VPN server perform different jobs. Many setup problems begin because users select the wrong feature.
VPN Client or VPN Server: Which One Do You Need?
A router configured as a VPN client sends internet traffic from connected devices through an external VPN provider. This is the setup most people mean when they search for how to install a VPN on a router.
A VPN server works in the opposite direction. It lets you connect securely to your home network while you are away. For example, you might use it to reach a home file server from a hotel.
| Router function | Direction of connection | Common purpose | Needed for a commercial VPN service? |
|---|---|---|---|
| VPN client | Router connects to an external VPN server | Route home devices through a VPN provider | Yes |
| VPN server | Remote device connects back to your router | Access your home network while travelling | Usually no |
| VPN passthrough | Allows VPN traffic from another device to cross the router | Use a VPN app on a computer or phone | No router-level protection |
| Site-to-site VPN | Connects two separate networks | Offices, remote buildings, advanced home labs | Rarely |
ASUS describes its VPN Fusion client as a way to provide VPN connectivity to devices that cannot install VPN software. TP-Link similarly explains that its router VPN client sends traffic from designated devices through an external VPN server. NETGEAR documentation for many consumer models, by contrast, describes a VPN server that remote devices connect to rather than a client for commercial VPN services. Always confirm which function your exact router supports.
Check Whether Your Router Can Run a VPN Client
Do not rely only on the manufacturer name. Two routers from the same brand may have completely different VPN capabilities.
Find the full model number and hardware revision on the label underneath or behind the router. A name such as “Archer AX55” may not be enough if several hardware versions exist. Then check the manufacturer’s support page and current firmware notes for that exact device. The CISA guidance on home router security explains why default credentials and insecure router settings can expose the entire home network.
Look for one of these terms in the administration interface or documentation:
- VPN Client
- VPN Fusion
- OpenVPN Client
- WireGuard Client
- VPN Director
- VPN Policy
- Client VPN
- Third-party VPN
A menu called only VPN Server, Remote Access, or VPN Service may not let the router connect to a commercial provider.
Router Compatibility Checklist
Before learning how to install a VPN on a router, confirm that you have:
- A router with VPN client support
- Administrator access to the router
- An active account with a VPN provider
- OpenVPN or WireGuard configuration files from that provider
- Current router firmware
- A backup of the existing router configuration
- A computer connected by Ethernet, if possible
- Instructions for restoring or resetting the router
- A record of the current internet and Wi-Fi settings
Updating the firmware is important because manufacturers may add VPN support, fix import errors, or patch security problems. CISA guidance recommends keeping router firmware current and replacing default administrator credentials.
Four Ways to Set Up a VPN on a Router
The appropriate method depends on the hardware you already own and how much configuration risk you are willing to accept.
| Setup method | Difficulty | Best for | Main drawback |
|---|---|---|---|
| Use the router’s built-in VPN client | Low to moderate | Most home users | Available only on supported models |
| Add a second VPN-compatible router | Moderate | Homes with a locked ISP router | Adds another device and network layer |
| Buy a router with VPN software preconfigured | Low | Users who want the simplest setup | Higher purchase price |
| Install OpenWrt or another supported firmware | High | Experienced users needing greater control | Incorrect firmware can disable the router |
The built-in client is usually the safest choice. It keeps the manufacturer’s interface, update process, Wi-Fi functions, and recovery tools.
Replacing the firmware should not be the first solution for a beginner. OpenWrt states that installation is device-specific and that the firmware image must match the exact router model. Its instructions also recommend verifying the downloaded file and using Ethernet during installation. A corrupt or incorrect image can leave the router unusable.
OpenVPN vs WireGuard for a Router VPN Setup
Most compatible routers support OpenVPN, WireGuard, or both. Your VPN provider must also supply a manual configuration for the selected protocol.
| Criterion | OpenVPN | WireGuard |
|---|---|---|
| Configuration file | Usually .ovpn | Usually .conf |
| Router compatibility | Broad, including many older models | More common on newer routers |
| Processing demand | Often higher | Usually lower |
| Configuration complexity | More options and certificates | Smaller, simpler configuration |
| Transport | UDP or TCP configurations are possible | Uses UDP |
| Best use | Compatibility and mature support | Speed and efficient router performance |
| Possible issue | Slow on routers with weak processors | Some routers reject unsupported config fields |
WireGuard uses public and private keys to identify peers and route encrypted traffic. Some router configurations also use a persistent keepalive setting to maintain the connection through NAT or firewall devices. The official WireGuard Quick Start guide provides technical details about key generation, peer configuration, allowed IP addresses, and persistent keepalive behaviour.
OpenVPN profiles commonly package server details, certificate information, protocol settings, and routing directives in an .ovpn file. OpenVPN’s documentation notes that client and server settings must agree on important values such as the transport protocol and interface type.
WireGuard is often the better first choice on a modern router because router processors have limited capacity compared with desktop computers. OpenVPN remains useful when the router or VPN service does not provide WireGuard support.
Protocol availability matters more than preference. A provider-specific protocol available only inside a desktop or mobile app cannot normally be imported into a standard router interface.
How to Install a VPN on a Router Step by Step
These instructions cover the common workflow used by ASUS, TP-Link, OpenWrt-based devices, travel routers, and other models with a built-in VPN client. Menu names will differ.
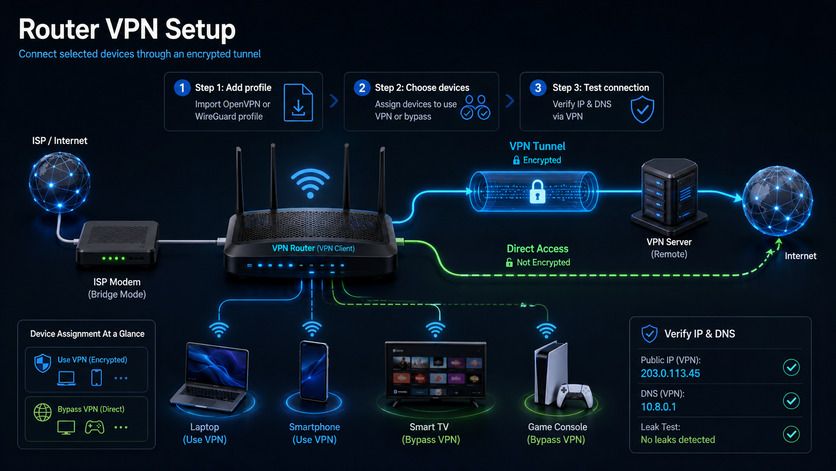
Step 1: Record the Exact Router Model and Firmware Version
Check the device label, administration dashboard, or router app. Write down:
- Manufacturer
- Complete model number
- Hardware revision
- Firmware version
- Current LAN IP address
- Internet connection type
Do not download firmware or follow a tutorial written for a similar-looking model. Small differences in hardware may require different firmware.
Step 2: Confirm That the Router Supports Client Mode
Open the manufacturer’s official support page and search for the exact model followed by “VPN client.”
If you find only instructions for connecting a phone or laptop back to the router, the documentation probably describes a VPN server. That does not confirm support for routing the household through a commercial VPN.
Log in to the router and inspect the advanced settings. Common locations include:
- Advanced > VPN Client
- VPN > VPN Fusion
- VPN > OpenVPN Client
- Services > VPN
- Network > Interfaces
Step 3: Update the Router Firmware
Install the latest stable firmware provided for your exact hardware revision. Save a configuration backup before updating.
Use an Ethernet connection when the manufacturer recommends it. Do not turn off the router during the update. After it restarts, confirm that internet access works before adding the VPN.
Some VPN features require a minimum firmware release. ASUS, for example, states that WireGuard VPN Fusion support requires firmware later than version 3.0.0.4.388.23000 on supported models.
Step 4: Obtain a Manual Configuration From the VPN Provider
Sign in to your VPN provider’s account page. Look for:
- Manual setup
- Router configuration
- OpenVPN configuration
- WireGuard configuration
- Configuration generator
- Service credentials
Choose a server location and download the appropriate profile.
For OpenVPN, this is normally an .ovpn file. Some services also issue a special username and password for manual connections. These credentials may differ from the email address and password used to sign in to the provider’s website.
For WireGuard, download a .conf file or generate a router profile. Do not assume that a profile already active on a phone can also be used by the router. TP-Link warns that the same WireGuard configuration should not be connected through multiple clients simultaneously.
Step 5: Log In to the Router Administration Page
Connect the computer to the router, preferably by Ethernet. Enter the router’s local address in a browser.
Common addresses include:
192.168.0.1192.168.1.1192.168.50.1- A manufacturer-specific local hostname
The correct address is normally printed on the router or shown as the default gateway in your computer’s network settings.
Use the administrator account, not the Wi-Fi password unless the same password was deliberately assigned to both.
Step 6: Create a New VPN Client Profile
Open the VPN client section and select an option such as:
- Add Profile
- Add Server
- Create Interface
- Set Up Manually
- Import Configuration
Choose OpenVPN or WireGuard. Give the profile a clear name, such as:
WireGuard Germany Frankfurt
A meaningful name is useful if you later add profiles for work, streaming, travel, or different countries.
Step 7: Import the Configuration File
Upload the .ovpn or .conf file from your VPN provider.
The router may automatically fill the server address, keys, DNS values, and routing information. Review the imported settings before saving.
An OpenVPN configuration file can contain the server address, connection protocol, certificates, authentication settings, routing directives, and other client parameters. Router firmware may reject directives that it does not support, so use a configuration generated specifically for router installation whenever your provider offers one. The official OpenVPN configuration documentation explains how client and server configuration files are structured.
A WireGuard import can fail when the file contains parameters the router firmware does not support. TP-Link’s current instructions specifically note that some models may require users to remove unsupported entries such as certain IPv6 or MTU values before importing the file. Make a copy before editing the original configuration.
Step 8: Decide Which Devices Should Use the VPN
Some routers send the entire network through one VPN tunnel. Others provide policy routing, device groups, or a list of clients that can be assigned individually.
Possible configurations include:
- All devices use the VPN
- Only a smart TV uses the VPN
- Work computers use one server
- Gaming consoles bypass the VPN
- Guest Wi-Fi uses the VPN
- Banking devices use the normal internet connection
ASUS VPN Fusion can assign selected devices to a VPN profile. TP-Link also allows designated devices to be enabled in its VPN Device List on supported models.
Begin with one test device rather than the entire home. A smaller test makes DNS, speed, and routing errors easier to diagnose.
Step 9: Activate the Tunnel
Save the profile and switch it on. The status should change to a value such as:
- Connected
- Active
- Running
- Handshake completed
- Up
If it remains on “Connecting,” wait one minute and then open the router log. Typical causes include incorrect credentials, an incompatible file, an unreachable server, or a protocol setting the router does not understand.
Step 10: Verify the VPN Connection
Do not rely only on a green connection icon.
On a device assigned to the VPN:
- Check the public IP address before activating the tunnel.
- Activate the router VPN client.
- Check the public IP address again.
- Confirm that the displayed country or region matches the selected server.
- Run a DNS leak test.
- Open several ordinary websites.
- Restart the test device and repeat the IP check.
- Restart the router and verify that the VPN reconnects automatically.
Also test a device that should bypass the tunnel. Its public IP address should remain unchanged when policy routing is configured correctly.
Router-Specific VPN Client Paths
The interface may change after a firmware update, but these are common current paths.
| Platform | Typical menu path | Common import method | Important note |
|---|---|---|---|
| ASUS VPN Fusion | VPN > VPN Fusion > Add Profile | Upload configuration | Supported devices can be assigned to profiles |
| TP-Link | Advanced > VPN Client | Add profile and browse for config | WireGuard is limited to selected models |
| OpenWrt LuCI | Network > Interfaces > Add New Interface | Create protocol interface and add packages/settings | More flexible but more technical |
| GL.iNet | VPN Dashboard or OpenVPN/WireGuard Client | Upload config or paste details | Interface differs by firmware generation |
| DD-WRT | Services > VPN | Enter or paste client settings | Build and model compatibility must be checked |
| Many NETGEAR home routers | Advanced > Advanced Setup > VPN Service | Often exports a server profile | Frequently a remote-access server, not a commercial VPN client |
ASUS Router Setup
On supported ASUS firmware, connect to the router, open VPN, select VPN Fusion, and add a profile. The official WireGuard process allows the user to upload the configuration file, assign end devices, apply the settings, and enable the profile.
Older ASUS interfaces may show OpenVPN under a VPN Client tab rather than VPN Fusion. Use the documentation written for the installed firmware.
TP-Link Router Setup
For a supported TP-Link model, open Advanced > VPN Client, enable the client feature, add a profile, choose the protocol, and import the file. Devices must then be added to the VPN access list. TP-Link notes that WireGuard is supported only on selected models and that accepted configuration parameters can vary.
Do not confuse Advanced > VPN Server with Advanced > VPN Client. They solve different problems.
OpenWrt Setup
OpenWrt can run OpenVPN and WireGuard clients on supported hardware, but the process may involve installing protocol packages, creating an interface, configuring firewall zones, and setting routing rules. Its WireGuard client documentation specifically addresses encrypted internet routing and leak prevention.
OpenWrt is appropriate when you need detailed policy routing or want to repurpose compatible hardware. It is less appropriate when the router is essential for work and you have no backup device or recovery experience.
NETGEAR Router Setup
Read NETGEAR documentation carefully. Many Nighthawk and Orbi guides explain how to enable a VPN service on the router and then install OpenVPN software on remote computers. That configuration allows the computer to connect back to the home router. It does not necessarily route the home network through a third-party provider.
Some NETGEAR business models have different client and site-to-site capabilities. Check the exact product documentation rather than applying consumer Nighthawk instructions to a business router.
What to Do When the Router Has No VPN Client
A missing VPN client menu is common with ISP routers. The firmware may be locked, simplified, or designed only to provide basic internet and Wi-Fi access.
There are four practical alternatives.
Add a Second Router Behind the ISP Router
Connect the WAN port of a VPN-compatible router to a LAN port on the ISP router. The second router creates a separate Wi-Fi network and runs the VPN client.
This arrangement lets you keep:
- The ISP router for ordinary devices
- The second router for VPN-connected devices
Possible disadvantages include double NAT, extra cabling, and more complicated access between devices on the two networks. Gaming, port forwarding, remote access, and some local discovery features may need additional configuration.
Use VPN Apps on Individual Devices
Device apps provide easier server switching, per-app split tunneling, clearer kill-switch controls, and automatic updates. They are often the better choice for computers and phones.
A router VPN is more useful for smart televisions, media players, consoles, cameras, and other devices that cannot run a native VPN application.
Replace the Router
A replacement may be justified when the existing device has weak Wi-Fi, no current security updates, limited processing power, and no VPN client.
Do not choose a router only because the product page contains the word “VPN.” Confirm:
- Client mode support
- OpenVPN and WireGuard availability
- Policy routing
- Automatic reconnection
- Kill-switch or block-untunneled-traffic behaviour
- Processor capability
- Firmware update history
- Compatibility with your VPN provider
Install Alternative Firmware
Use this option only when the exact model and hardware revision are listed as supported. Review the device-specific installation and recovery instructions before downloading anything.
If the official support table does not list your hardware revision, do not experiment with an image intended for another version.
Hypothetical Scenario: One Home, Two Internet Routes
Consider a household with four people. The network includes two work laptops, several phones, a smart TV, a game console, and smart-home devices.
Sending everything through one distant VPN server creates unnecessary problems. Video calls may gain latency, the console may have a less favourable route, and local services may challenge logins because the public IP address changed.
A more practical router VPN setup would be:
- Smart TV through a nearby VPN server
- One work laptop through a company-required tunnel or its own VPN app
- Game console through the normal connection
- Phones controlled through their individual VPN apps
- Smart-home devices on a separate non-VPN network
- Guest devices on a restricted guest network
The technical achievement is not getting every device into one encrypted tunnel. The useful outcome is routing each device according to its actual requirements.
Composite Examples From Common Home Setups
These examples combine recurring setup patterns rather than describing specific customers.
Example 1: Streaming Device Without a VPN App
A user wants to connect a television box through a VPN but cannot install an application on it. The router supports device-based VPN rules.
The user imports a WireGuard profile, activates it only for the television box, and leaves computers on the regular connection. When the VPN server requires maintenance, the rest of the network remains unaffected.
Example 2: Locked ISP Router
An ISP router provides no VPN client and cannot be replaced because it also handles the telephone connection.
A small VPN-compatible router is connected behind it. Work and travel devices join the second router’s Wi-Fi, while phones and home automation remain on the ISP router. This avoids changing the provider’s equipment.
Example 3: Older Router With Severe Speed Loss
An older router successfully imports an OpenVPN file but internet speed drops sharply whenever the tunnel is active.
The configuration is not necessarily wrong. Encryption is being processed by the router’s limited CPU. Switching to a supported WireGuard profile may improve performance. If WireGuard is unavailable, a newer router or device-level VPN application may be required.
Speed, Latency, and Router Hardware
A VPN connection adds encryption work and sends traffic through an additional server. The result can include lower throughput and higher latency.
Router performance depends on:
- Processor architecture and clock speed
- Hardware acceleration
- VPN protocol
- Encryption implementation
- Distance to the VPN server
- Internet connection speed
- Number of active devices
- Router temperature and workload
- Quality of the VPN server
- Firewall and traffic-analysis features
Run three tests:
- Internet connection without the VPN
- Same device through the router VPN
- Same VPN server through the provider’s desktop app
The third test is especially informative. If the desktop app is fast but the router is slow, the router is probably the bottleneck. If both are slow, try a nearer server or another protocol.
Do not expect a low-cost router to encrypt a gigabit connection at full speed. Wi-Fi speed shown on the product box is not the same as VPN throughput.
Split Tunneling and Policy Routing
Router-level split tunneling decides which devices, destinations, or traffic types use the VPN. Manufacturers may call it:
- VPN policy
- Policy routing
- VPN director
- Device assignment
- Client list
- Routing rules
Device-based rules are easier to maintain than destination-based rules. A television can remain assigned to the VPN even when websites change their server addresses.
Destination-based routing is useful for advanced work networks but requires more maintenance. Modern services use content delivery networks, changing IP ranges, and multiple domains, so a rule based on one address may stop working.
Test local access after enabling policy routing. Printers, casting devices, network storage, and smart-home controllers may become unreachable when the VPN interface is isolated from the LAN.
Common VPN Router Problems and Fixes
| Problem | Likely cause | Practical fix |
|---|---|---|
| No VPN Client menu | Unsupported model, old firmware, or server-only feature | Update firmware and check exact model documentation |
| Profile will not import | Unsupported directive or wrong protocol file | Generate a router-specific profile or remove only vendor-documented unsupported fields |
| Status remains “Connecting” | Bad credentials, blocked port, expired profile, or unreachable server | Test another server and confirm manual credentials |
| Connected but no internet | DNS, default-route, firewall, or AllowedIPs problem | Review DNS and routing values, then test one device |
| Public IP does not change | Device is not assigned to the VPN | Enable VPN access for that device |
| Some websites fail | DNS conflict, MTU issue, blocked VPN IP, or IPv6 leak | Try another server and follow provider-specific MTU or IPv6 instructions |
| Local printer disappears | LAN traffic is being sent or blocked through the tunnel | Allow local network access or adjust policy routing |
| Connection drops after inactivity | NAT timeout or keepalive issue | Use the provider’s recommended persistent keepalive value |
| Speed is much lower | Router CPU limitation or distant server | Try WireGuard, a nearby server, or a stronger router |
| VPN does not reconnect after reboot | Profile is not set to auto-start | Enable automatic connection and test another restart |
Change one setting at a time. Replacing the protocol, server, DNS values, firmware, and routing rules simultaneously makes the cause difficult to identify.
Keep an unmodified copy of every downloaded configuration file. Add dates and server locations to the filenames so an old profile can be identified later.
Security Checklist After Installation
Use this checklist after you install a VPN on a router:
- Router firmware is current.
- The router administrator password is unique.
- Remote administration from the internet is disabled unless required.
- The VPN profile came from the provider’s official account or documentation.
- The original configuration file is stored securely.
- The VPN reconnects after the router restarts.
- The public IP address changes on assigned devices.
- DNS requests use the intended resolver.
- Devices excluded from the VPN retain normal connectivity.
- Local printers and storage devices remain accessible where required.
- The router blocks traffic or follows a defined fallback rule if the VPN disconnects.
- Old VPN profiles and unused administrator accounts have been removed.
- Router configuration backups are stored outside the router.
- Performance has been tested at several times of day.
A router VPN protects traffic only between the router and the VPN server. It does not remove malware, correct unsafe browser behaviour, encrypt unprotected traffic beyond the VPN exit server, or make an untrustworthy VPN provider safe.
Frequently Asked Questions
Can I Install a VPN on Any Router?
No. The router must support VPN client mode or compatible alternative firmware. Many ISP routers provide only VPN passthrough or a VPN server. Search the exact model and hardware revision before purchasing a VPN subscription for router use.
Do I Need to Install Software on the Router?
Usually not in the traditional sense. On routers with a built-in client, you import an OpenVPN or WireGuard configuration through the administration interface. Alternative firmware is a separate operating system and carries more risk.
Is OpenVPN or WireGuard Better for a Router?
WireGuard is usually preferable on modern supported hardware because it has a simpler configuration and often places less demand on the router. OpenVPN has broader compatibility, particularly on older routers. The best option is the protocol that both your router and VPN provider support reliably.
Does a Router VPN Protect Every Connected Device?
It protects devices whose traffic is routed through the active tunnel. Policy routing may exclude some devices. Guest networks, mesh nodes, Ethernet clients, or secondary access points may follow different rules depending on the network design.
Will a VPN Slow Down My Wi-Fi?
The Wi-Fi connection itself may remain strong while internet throughput drops because the router must encrypt traffic. The protocol, server distance, router processor, and internet speed determine the actual reduction.
Can I Use a VPN Router With an ISP Router?
Yes. Connect a VPN-compatible router behind the ISP device and use its separate Wi-Fi network. This is a practical solution when the ISP router is locked or required for telephone and television services. Be prepared to manage double NAT if an application requires inbound connections.
Why Does My Router Have a VPN Server but No VPN Client?
The manufacturer designed the feature for remote access to your home network rather than connecting your home to a commercial provider. The two functions use related technology but reverse the connection direction.
Can I Use the Same WireGuard File on My Phone and Router?
Do not assume that you can. WireGuard profiles contain identity and peer information, and some providers or router manufacturers expect a separate profile for each client. Generate a dedicated router configuration whenever possible. TP-Link explicitly advises against connecting the same WireGuard configuration through multiple clients simultaneously.
Should I Route My Entire Home Through the VPN?
Not automatically. Devices used for gaming, banking, work access, casting, and local smart-home control may perform better outside the tunnel. Begin with one device, verify the connection, and add others only when the VPN serves a clear purpose.
How Do I Know the Router VPN Is Working?
Check the public IP address and DNS behaviour on a device assigned to the tunnel. Restart both the device and router, then repeat the test. A connected status inside the router interface is useful, but it does not prove that the intended device is using the tunnel.
The Safest Installation Approach
The safest way to install a VPN on a router is to use a VPN client already included in the manufacturer’s current firmware. Confirm the exact router model, download a dedicated OpenVPN or WireGuard profile, test it on one device, and verify both the public IP address and DNS routing.
Buy or add a second compatible router when the ISP device lacks client mode. Consider alternative firmware only after checking exact hardware support, recovery instructions, and the consequences for the manufacturer’s warranty.
A successful setup is not defined by a green connection indicator. It should reconnect after a restart, preserve required local-network access, route only the intended devices, and deliver acceptable performance without exposing traffic when the tunnel fails.